A proposal was passed to integrate bATOM as collateral on Anchor Protocol, presenting the first decentralized use case for borrowing against ATOM & staked ATOM.
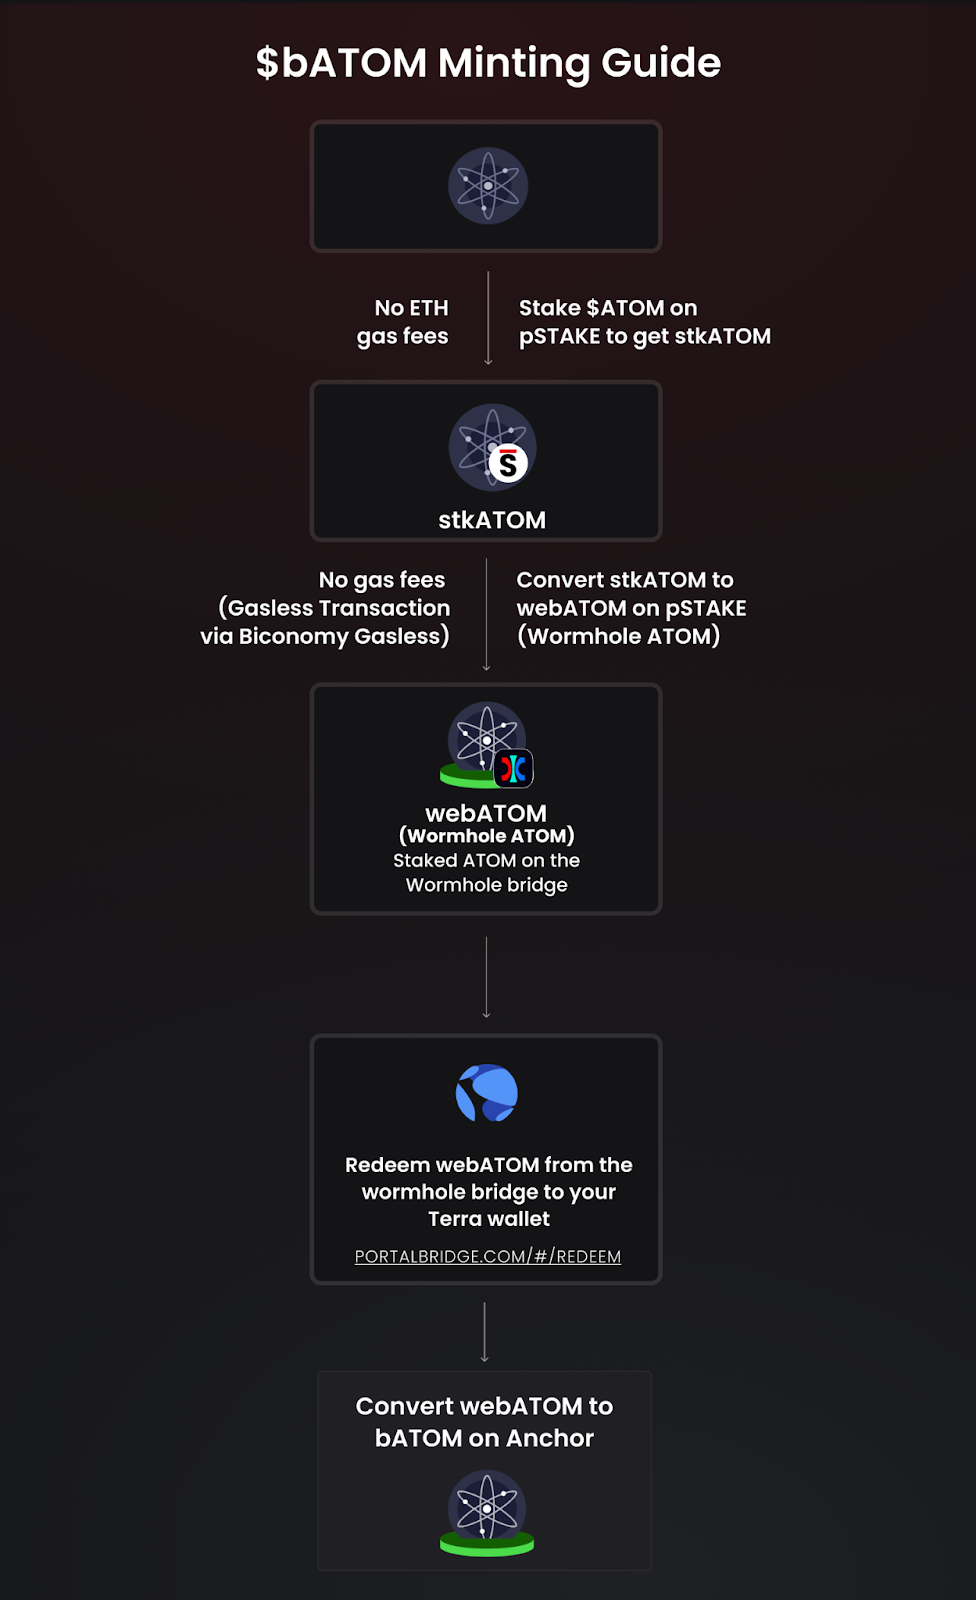
We’ve created a detailed step-by-step guide on how to get started with minting and collateralising your bATOM to borrow UST. Before you begin, here is a high-level flow diagram outlining the entire process:

What is bATOM?
bATOM is the wrapped version of pSTAKE’s ERC-20 stkATOM that runs on the Terra blockchain. stkATOM holders will have the ability to convert their tokens into bATOM directly on the pSTAKE and Wormhole bridge applications through a wrapping interface.
Using bATOM as collateral on Anchor Protocol lets holders engage in more DeFi activities with their borrowed UST tokens, including depositing on Anchor itself to earn close to 20% APY.
♦️Learn more about bATOM here

Minting bATOM
stkATOM holders can convert their tokens to bATOM through the pSTAKE web application. You’ll need to hold at least 5 ATOM in your wallet to begin the process of wrapping in order to acquire stkATOM.
Follow the below steps to mint your bATOM tokens on the Terra blockchain.
Please ensure that you have sufficient ETH in your Ethereum wallet and LUNA in your Terra wallet to pay for transaction fees.
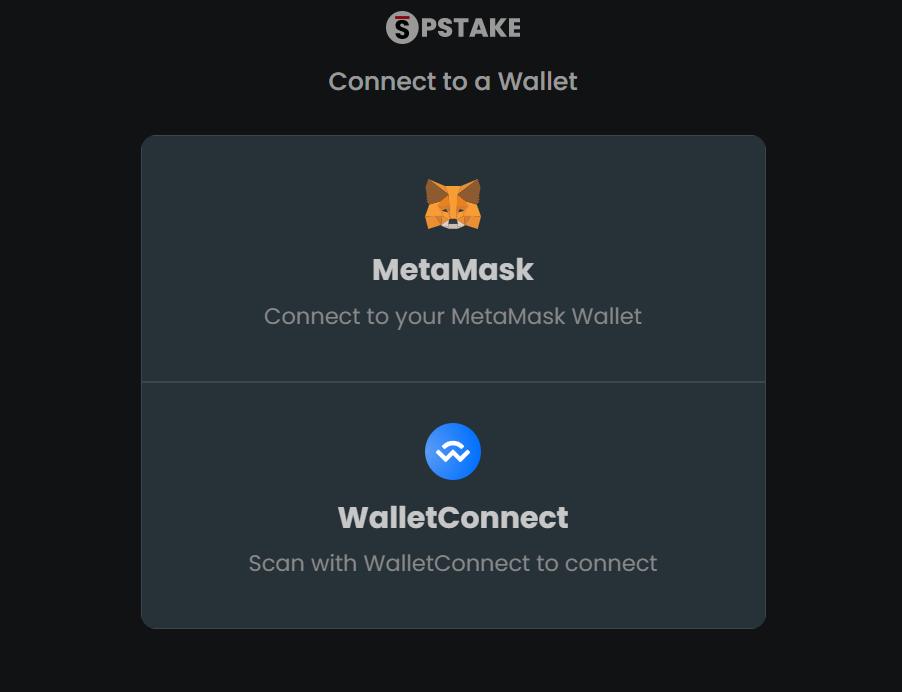
Step 1: Connect Your Wallet
Navigate to https://app.pstake.finance/ and select MetaMask to proceed with connecting to the pSTAKE web app.
If you don’t already have stkATOM, you’ll next need to stake ATOM via pSTAKE to mint stkATOM.
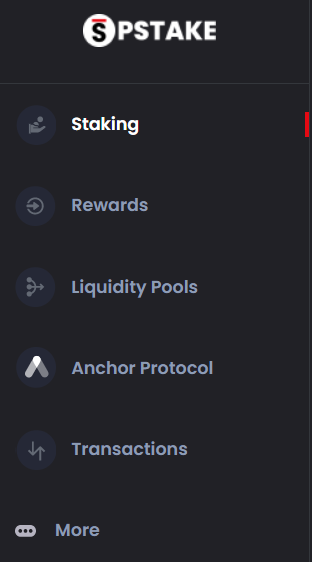
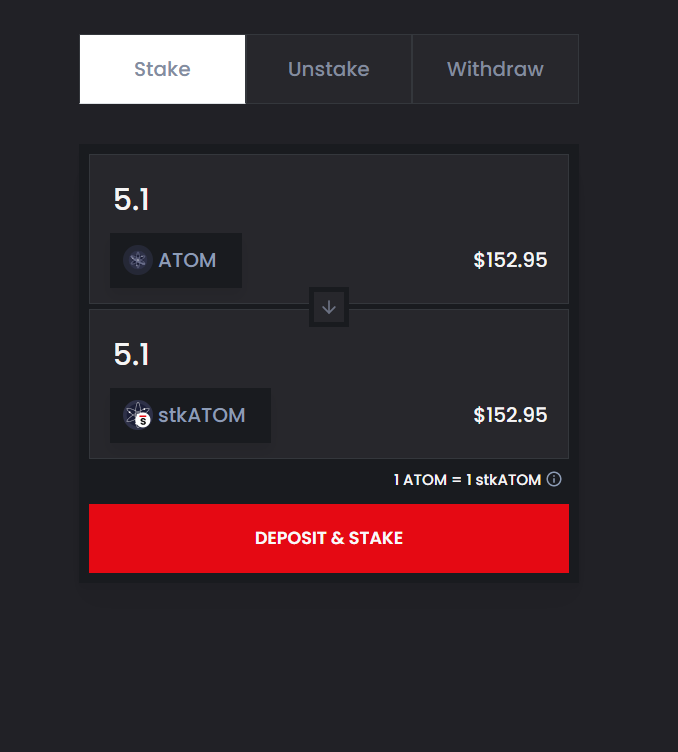
Step 2: Stake Your ATOM to Mint stkATOM
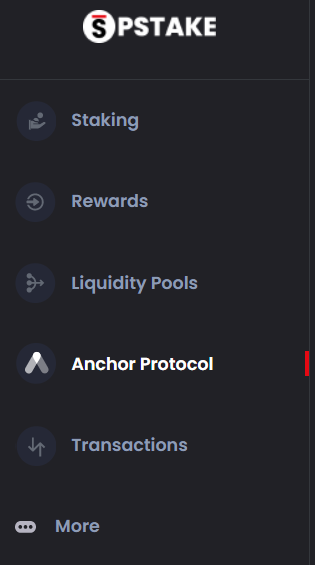
Select Staking from the left-hand menu.
Select the amount of ATOM you want to stake and click Deposit & Stake.
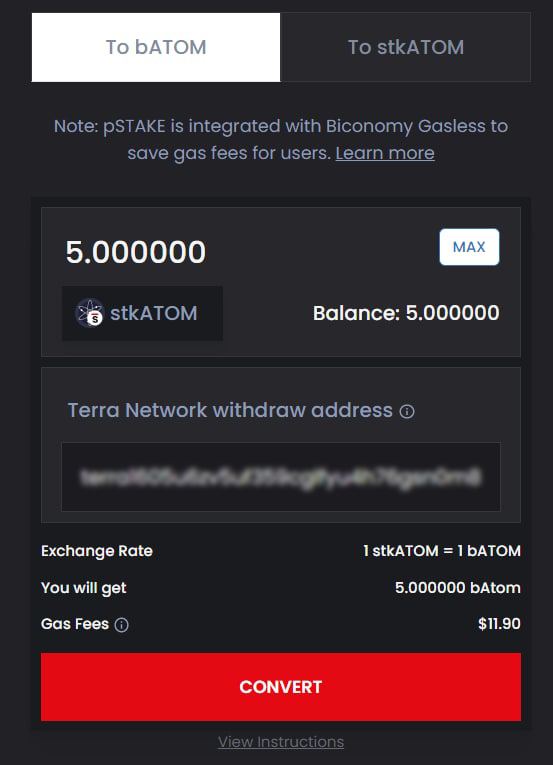
Step 3: Begin the bATOM Conversion Process
On the left-hand menu, select Anchor Protocol.
Next, select the number of stkATOM tokens you would like to convert. Enter your Terra network withdrawal address and click Convert when ready.
Please note that users will be eligible for gasless transactions if more than 5 stkATOM tokens are converted at this stage.
For first time users, an approval transaction will need to be signed to allow the conversion transaction from stkATOM to webATOM. Click ‘Confirm’ to sign the transaction when prompted.
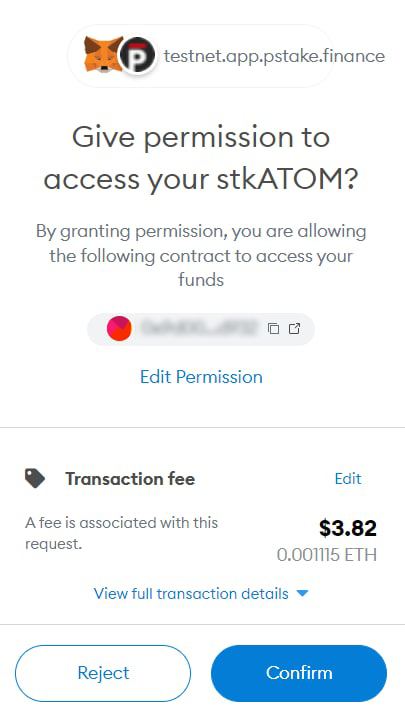
Note: This approval transaction is not gasless. Users will be required to pay a relatively small gas fee (in the form of ETH).
The conversion interface uses the Wormhole bridge to bridge your assets from the Ethereum network to the Terra blockchain by converting the stkATOM into webATOM (Wormhole ATOM).
Once you click Convert, your MetaMask wallet will open and you’ll be prompted to sign the transaction – click Sign to continue.
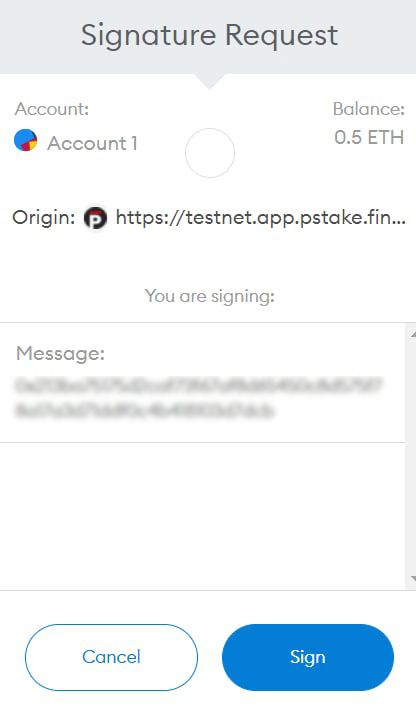
Please note that gas fees are not required for this signature.
Step 4: stkATOM – webATOM Transaction Processing & Confirmation
A new popup screen will appear with three subsequent steps listed – please wait for the first two steps to process before continuing, and you will see a green checkmark appear next to each when completed.
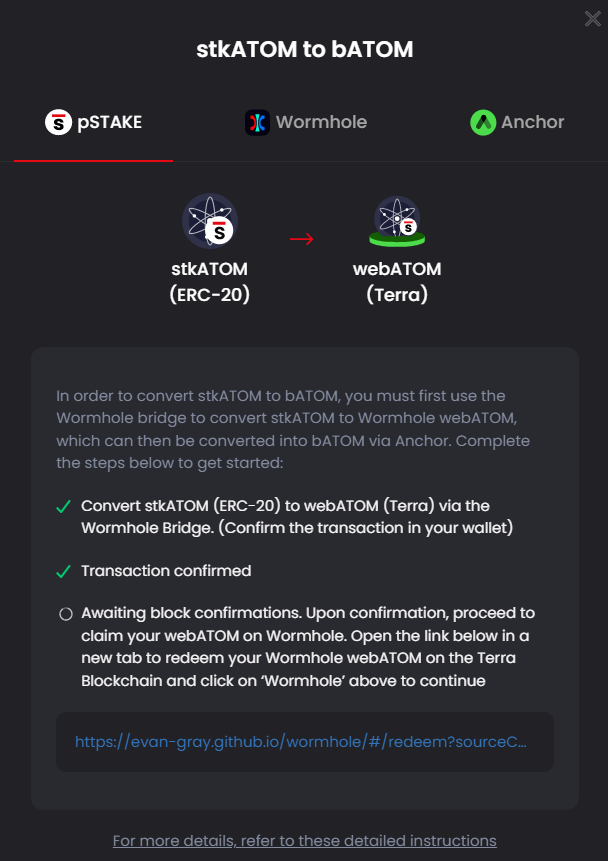
After the first two steps are completed, the third step will automatically begin where the blocks will be confirmed. Please be patient, as this step can take several minutes.
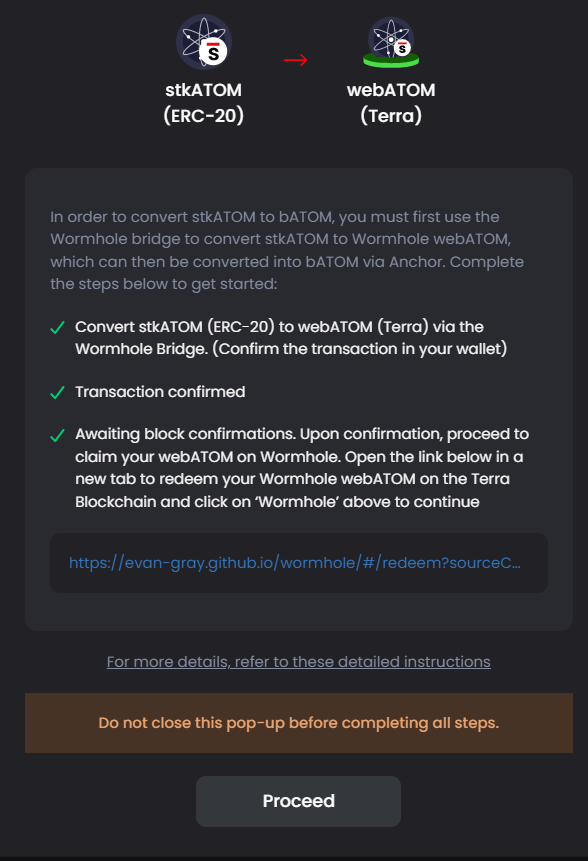
Please do not exit the popup window or page until all steps have been completed. Once the third step has finished and confirmed, click the blue link near the bottom to proceed to the next step.
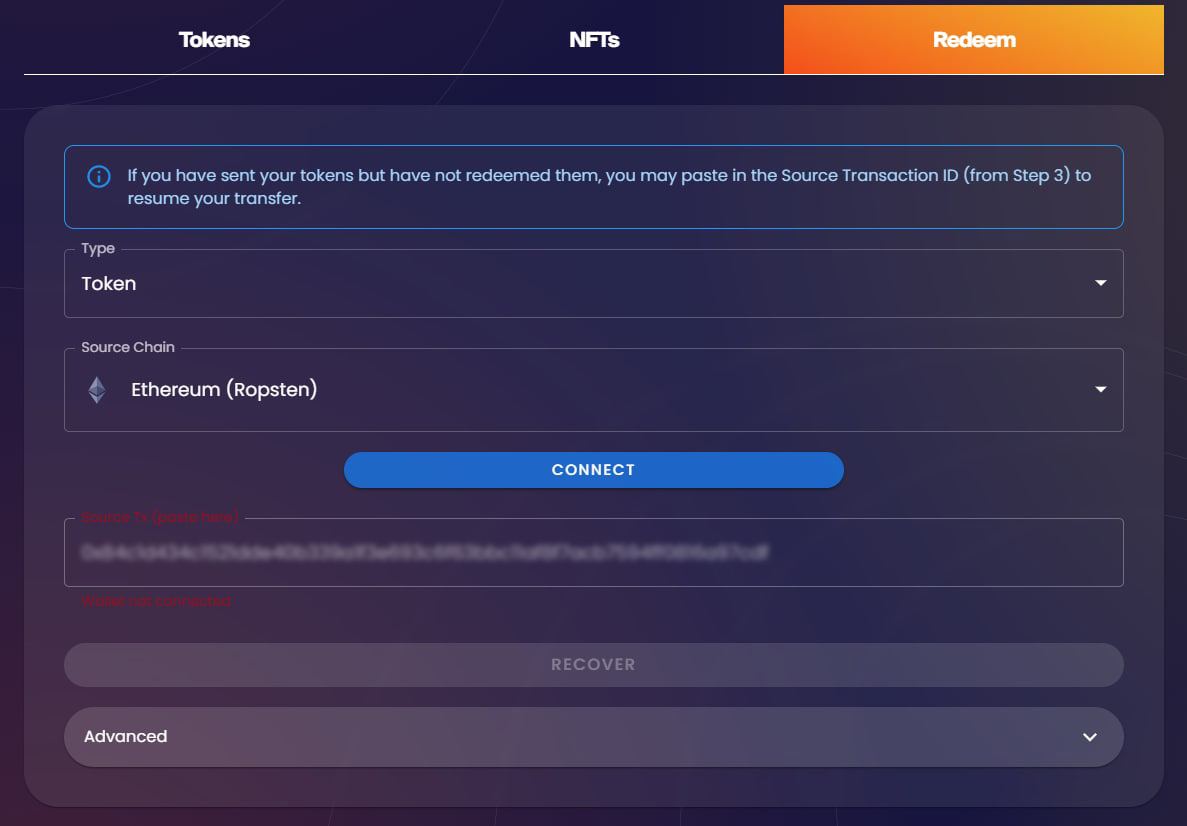
Step 5: Connect to the Wormhole Bridge & Redeem webATOM
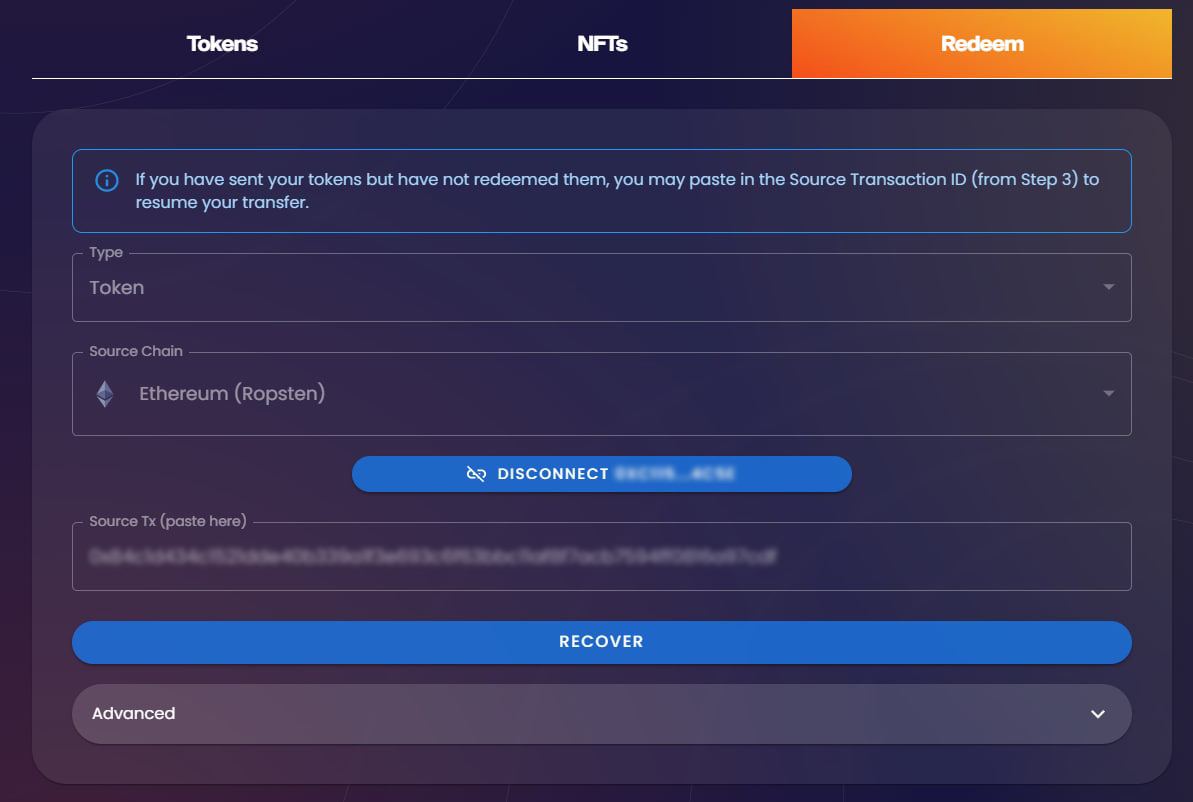
Once you click on the link at the bottom of the popup, you will now be taken to the Wormhole portal page on the Redeem tab, where the “Type,” “Source Chain,” and “Source Tx” fields will be pre-populated – you can also fill these in manually if preferred.
Please note that the indicated “Source Tx” represents the transaction hash of the conversion transaction within the pSTAKE app.
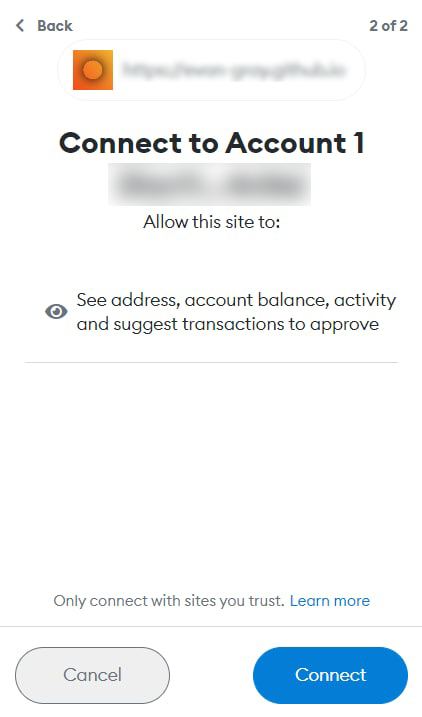
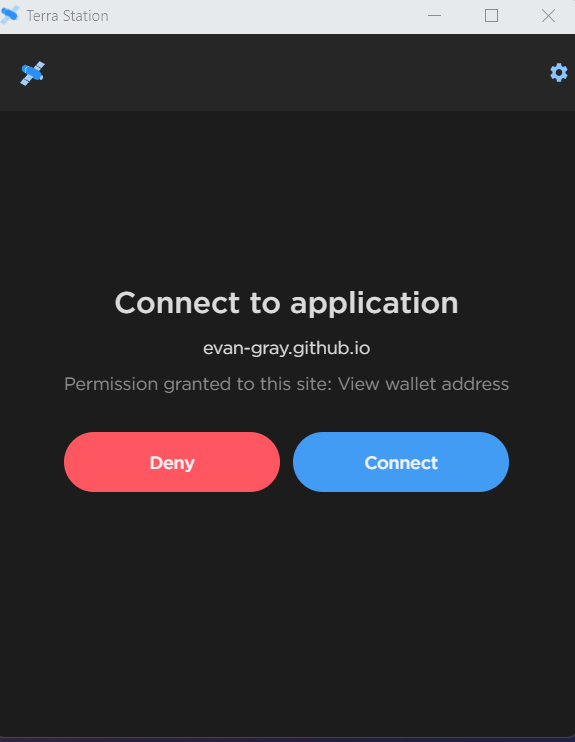
To continue, select the Connect button.
Your MetaMask wallet will open – click Connect to link your wallet to the Wormhole interface.
Your Ethereum wallet will now be connected to the Wormhole bridge – click the Recover button to proceed.
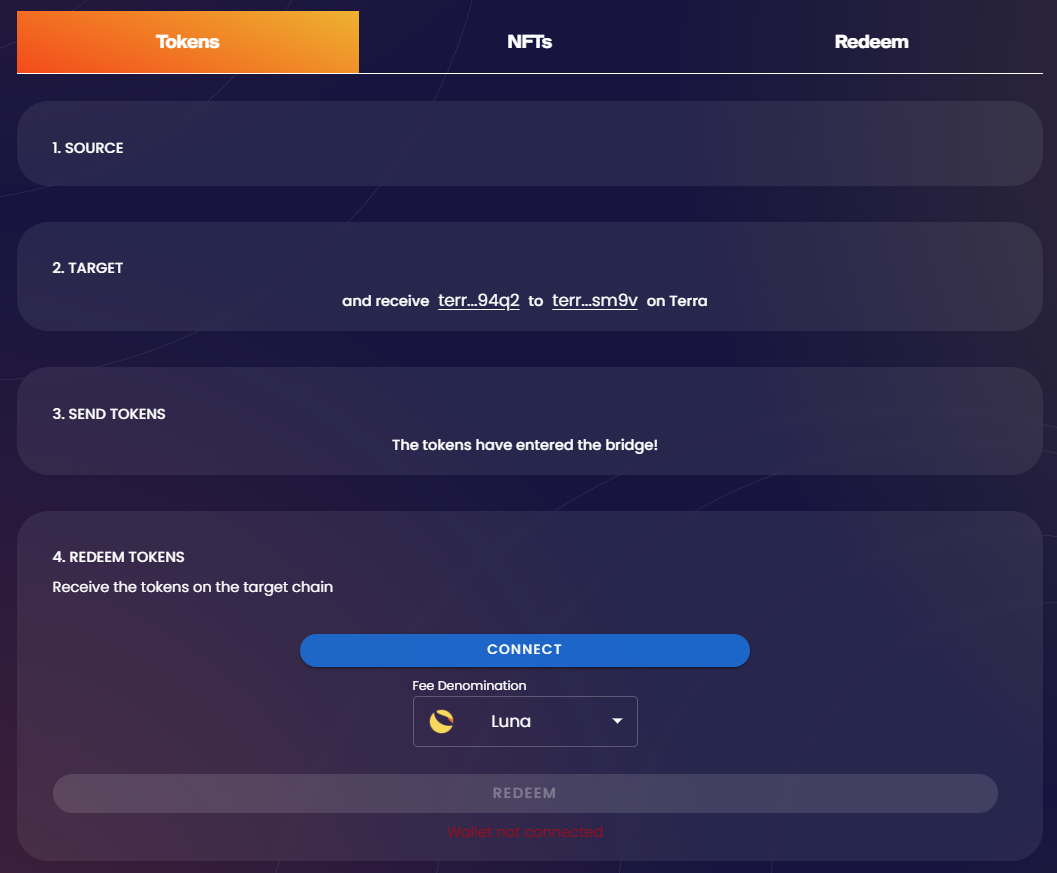
Once you click recover, you will be navigated to the Tokens tab. Scroll to the bottom and click Connect.
A popup window will appear that will prompt you to select your preferred Terra wallet. For this example, we will use the Terra Station wallet.
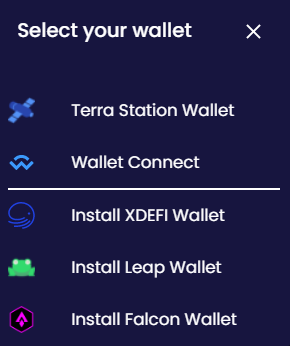
Click Connect to proceed with linking your wallet to the Wormhole interface.
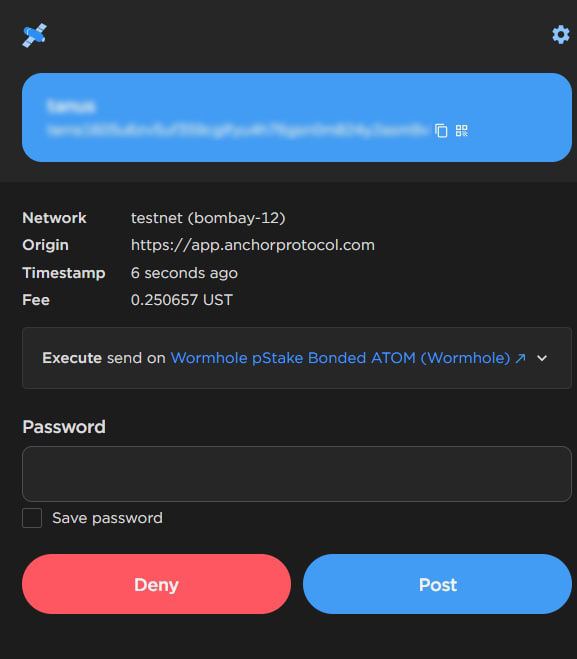
Next, you will be redirected back to the Tokens tab. Click Redeem at the bottom to proceed.
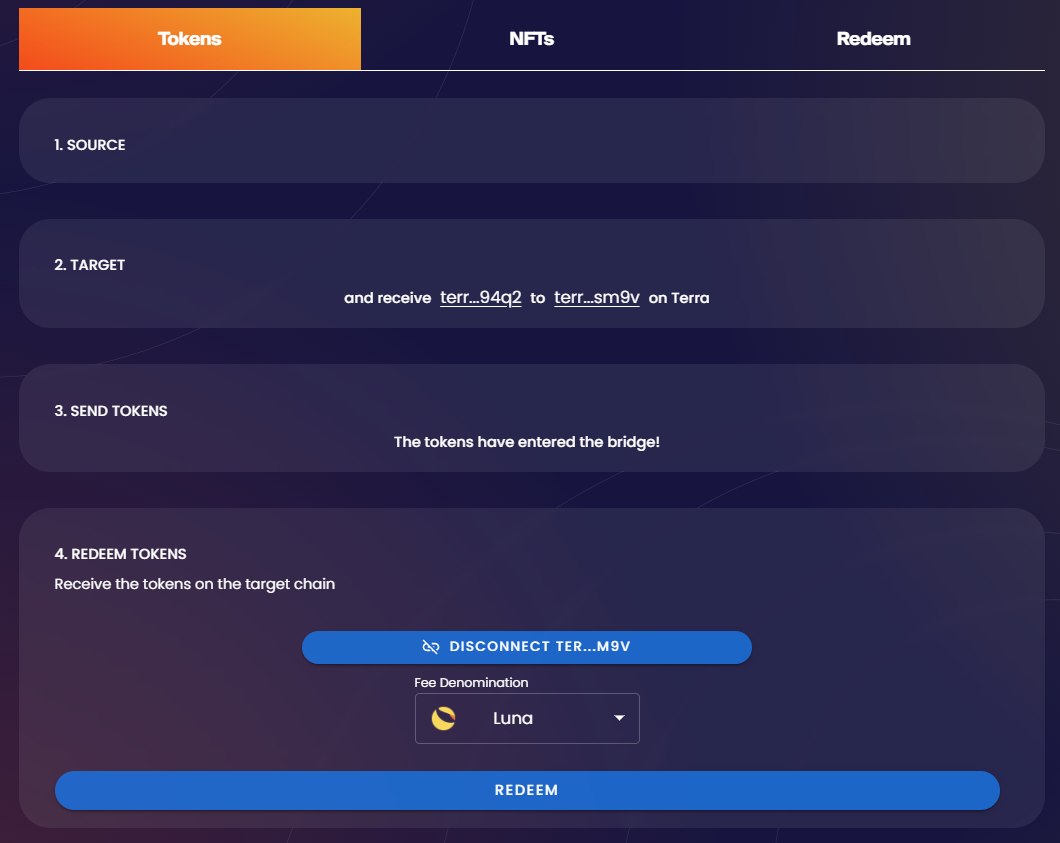
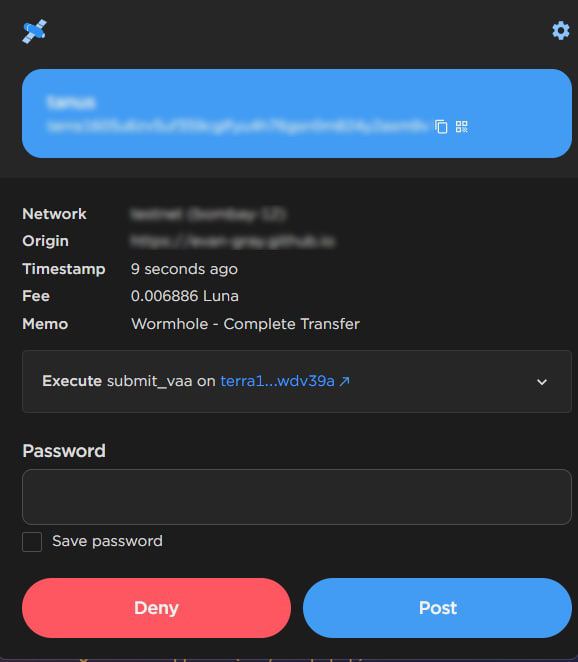
Your wallet will open with transaction details – enter your password and click Post to redeem your webATOM tokens into your Terra wallet.
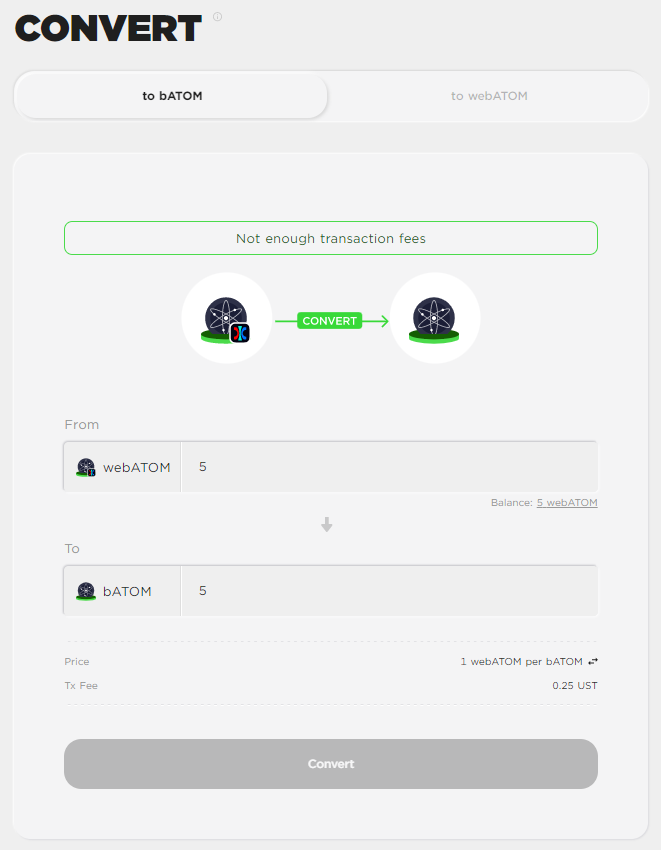
Step 6: Convert webATOM to bATOM
Now that your webATOM tokens are in your Terra wallet, navigate to https://app.anchorprotocol.com/ and click on the bASSET tab to begin converting your assets into bATOM.
Click on the bATOM/webATOM section to proceed.
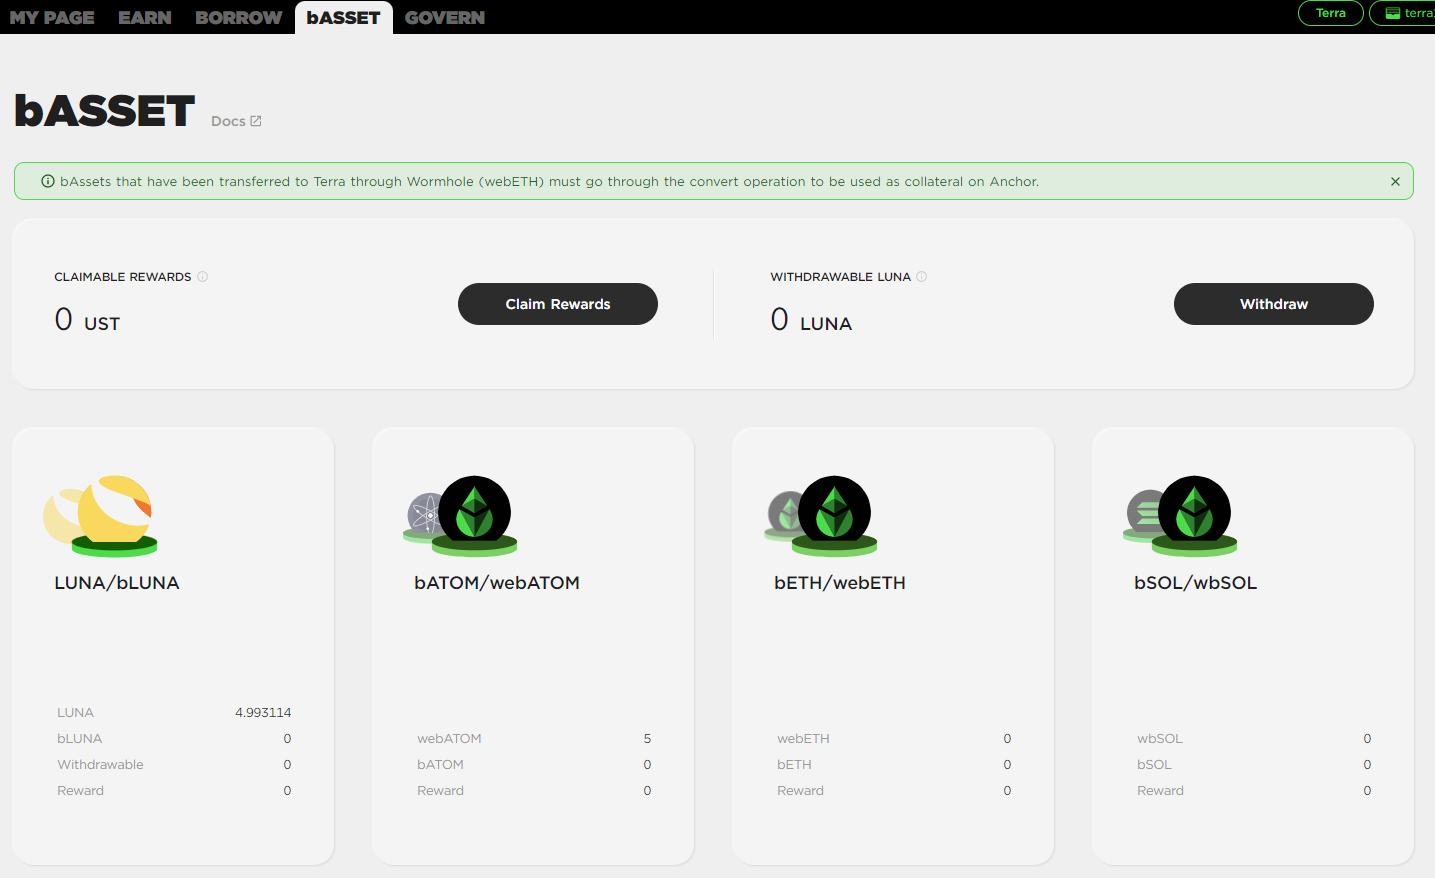
Please ensure you are on the bATOM tab – then select the amount of webATOM you want to convert under From. The system will display that you will receive an equal amount of bATOM.
Click Convert to continue with the process.
Your Terra wallet will open once again – type in your password and click Post to proceed.
Collateralizing bATOM
Now that you have successfully minted your bATOM, you can choose to collateralise your tokens on Anchor Protocol in order to borrow UST against them.
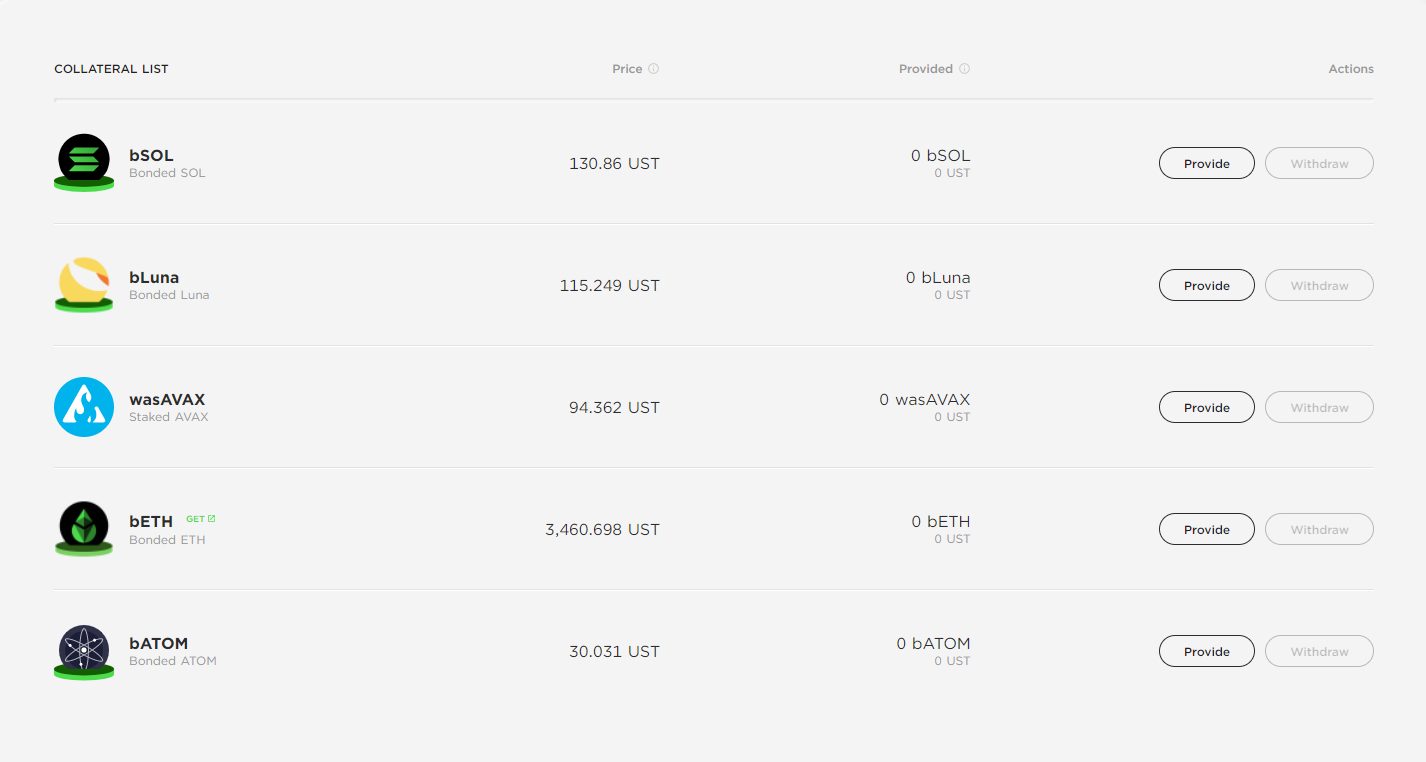
Step 1: Navigate to the Borrow tab
Go to the top menu bar and select the BORROW tab. Scroll down the page until you find bATOM, then click Provide on the right-hand side.
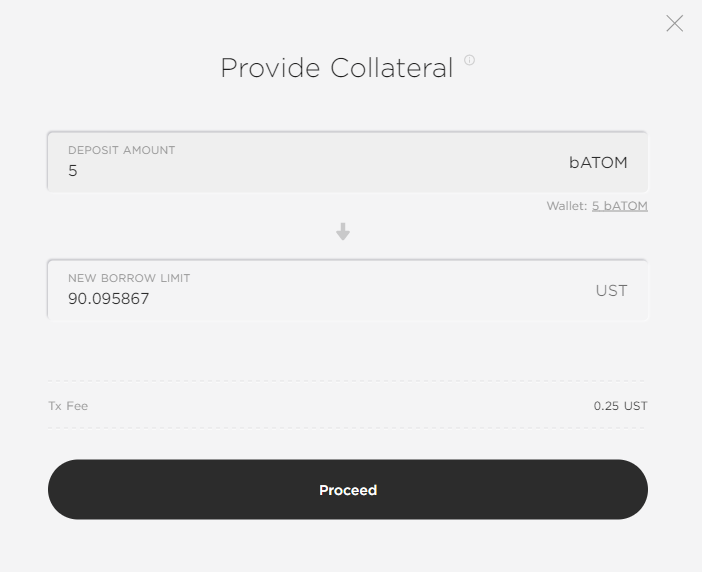
Step 2: Provide Collateral
Next, a popup window will appear, prompting you to enter your preferred deposit amount. Input the amount of bATOM you would like to provide as collateral (which will display the net borrow limit in UST) and click Proceed.
Your Terra wallet will open – enter your password and select Post to continue.

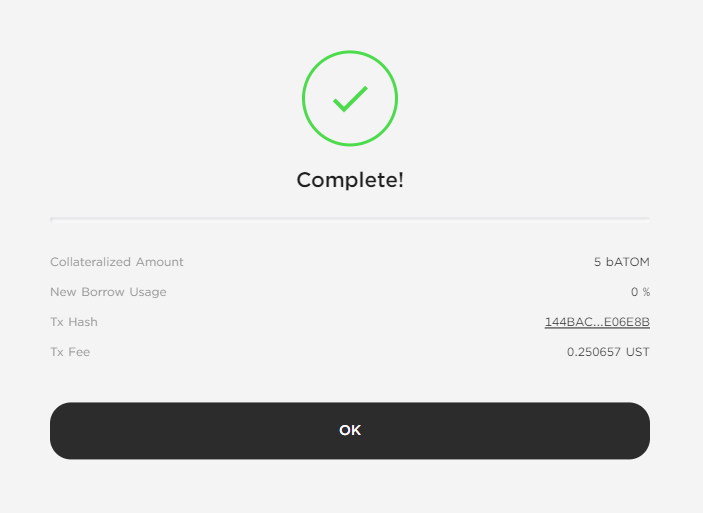
Once you’ve posted the transaction, the below screen will appear confirming that you’ve successfully collateralised your bATOM. Congratulations – you can now use your borrowed UST on Anchor Protocol for staking other DeFi activities!
We hope that this guide was comprehensive and helped make the process easier for both minting and collateralising your bATOM. The integration of bATOM on Anchor Protocol marks an exciting time for pSTAKE’s stkATOM, bringing greater utility for liquid staked assets on our platform.
Please feel free to reach out in our Telegram community group should any further questions arise regarding this process.
About pSTAKE
pSTAKE is a liquid staking protocol that unlocks liquidity for your staked assets. With pSTAKE, you can securely stake your Proof-of-Stake (PoS) assets, participate in protocol improvements and security to earn staking rewards, and receive staked underlying representative tokens (stkASSETs) which can be used to explore additional yield opportunities across DeFi.
At present, pSTAKE supports Binance Chain (BNB), Cosmos (ATOM), Persistence (XPRT), and Ethereum (ETH) networks’ native tokens, with a view to support more chains and assets in the future (SOL, and AVAX).
Developed by Persistence
Persistence is a Tendermint-based, specialised Layer-1 network powering an ecosystem of DeFi applications focused on unlocking the liquidity of staked assets. Persistence facilitates the issuance and deployment of liquid-staked stkASSETs, allowing users to earn staking rewards while participating in DeFi primitives, such as lending/borrowing and liquidity provisioning on DEXs.
Persistence aims to offer a seamless staking and DeFi experience for PoS (Proof-of-Stake) users and enable developers to build innovative applications around stkASSETs.
Join Our Movement
Twitter | LinkedIn | Telegram | YouTube | Reddit | [email protected]